

If you’ve ever wondered how to make seitan at home, you’re in the right place. This easy seitan recipe is perfect for beginners who want a high-protein vegan meat substitute without complicated steps. Made from vital wheat gluten, seitan has a meaty texture that works well in many dishes, from stir-fries to sandwiches.
The best part? You can fully control the flavor, texture, and seasoning, making it better than store-bought options. Whether you want soft, tender seitan or a more chewy bite, this guide will show you exactly how to get it right. We’ll cover everything—from step-by-step instructions to common mistakes and fixes—so you can make perfect homemade seitan every time, even if you’re trying it for the first time.
Quick Answer: How To Make Seitan?
Seitan is made by mixing vital wheat gluten with water or broth and seasonings to form a dough, then kneading it to develop texture, and finally cooking it by steaming, boiling, or baking until firm and chewy.
This easy seitan recipe creates a high-protein vegan meat substitute with a rich, meaty texture that can be used in many dishes.
What Is Seitan?
Seitan is a popular plant-based protein made from vital wheat gluten, the main protein found in wheat. When mixed with liquid and cooked, it forms a firm, chewy texture that closely resembles meat, which is why it’s often called “wheat meat.”
In terms of taste and texture, seitan is mild on its own but absorbs flavors very well. This makes it perfect for creating chicken-style, beef-style, or even spicy vegan dishes. Its texture can range from soft and tender to firm and chewy, depending on how you prepare it.
Many people use homemade seitan because it’s a high-protein vegan meat substitute that is affordable, versatile, and easy to customize. It’s especially popular in vegan and vegetarian diets for replacing meat in everyday meals.
Two Ways to Make Seitan
There are two main methods for learning how to make seitan, and choosing the right one depends on your time, skill level, and desired texture.
Vital Wheat Gluten Method (Quick & Easy)
This is the most common and easy seitan recipe used today. You simply mix vital wheat gluten with liquid and seasonings, knead the dough, and cook it.
Why use this method:
- Fast and beginner-friendly
- Consistent results
- Perfect for everyday cooking
Best for: Beginners, quick meals, and reliable texture
Washed Flour Method (Traditional)
This traditional method involves washing regular flour dough to remove starch, leaving behind pure gluten. It’s known as the washed flour seitan method.
Why use this method:
- More traditional and authentic
- Can create unique, layered textures
- No need for packaged gluten
Best for: Advanced users or those without access to vital wheat gluten
When to Use Each Method
- Choose vital wheat gluten seitan if you want a quick, simple, and foolproof result
- Choose the washed flour method if you want a traditional approach and don’t mind extra time and effort
For most people, especially beginners, the vital wheat gluten method is the best way to make seitan at home
Ingredients Breakdown (With Roles + Science + Substitutes)

You might also like: How to Make Marinated Tempeh Wrap Crispy Recipe
Understanding your ingredients is the key to making perfect homemade seitan with the right texture and flavor.
Vital Wheat Gluten (Protein Structure)
This is the main ingredient in any seitan recipe. Vital wheat gluten is pure wheat protein, and it’s what gives seitan its meaty, chewy texture.
Science: When mixed with liquid and kneaded, gluten forms elastic strands that create that signature “meat-like bite.”
Liquid (Hydration + Flavor)
You can use water or vegetable broth, but broth is always better for flavor.
Why it matters:
- Hydrates the gluten
- Adds depth and richness
- Helps avoid bland seitan
Seasonings (Umami Impact)
This is where your vegan meat substitute gets its flavor.
Common options:
- Soy sauce (salt + umami)
- Garlic powder, onion powder
- Nutritional yeast (savory boost)
Pro Tip: Strong seasoning = better seitan chicken or beef-style flavor
Substitutes (Realistic Limitations)
There are very limited substitutes for vital wheat gluten.
- You can try the washed flour seitan method
- But there is no direct gluten-free alternative
Important: Seitan is not suitable for gluten-free diets
Step-by-Step: How To Make Seitan (Foolproof Beginner Method)
Follow this easy step-by-step guide to make perfect seitan for beginners
1. Mixing the Dough
Combine vital wheat gluten, liquid, and seasonings in a bowl. Mix until it forms a soft dough.
Goal: A firm but slightly elastic dough
2. Kneading (How Much + Why)
Knead the dough for about 2–5 minutes.
Why kneading matters:
- Develops gluten structure
- Controls texture
Less kneading → softer seitan
More kneading → chewier seitan
3. Shaping Techniques
Shape the dough based on how you want to use it:
- Small chunks → stir-fries
- Logs or cutlets → sandwiches
- Thin strips → seitan chicken style
4. Cooking Process
Cook your seitan using one of these methods:
- Steaming → best texture
- Boiling → softer result
- Baking → firmer texture
This step turns raw dough into a high-protein vegan meat substitute
Advanced Techniques for Better Seitan

If you want to level up your homemade seitan, these techniques will make a big difference.
Stretching & Layering Gluten
Stretch the dough and fold it over itself before cooking.
Result:
- Creates layered texture
- More realistic “meat-like” bite
Shredded “Chicken-Style” Texture
After partially cooking, pull the dough apart into strands.
Result:
- Perfect for seitan chicken recipes
- Great for tacos, wraps, and sandwiches
Controlling Density
You can control how dense or soft your seitan turns out:
- More liquid → softer texture
- Less liquid → firmer texture
- Short cooking time → tender
- Longer cooking → dense and chewy
Mastering this is the key to making the best homemade seitan recipe every time
Cooking Methods Compared (Steam vs Boil vs Bake vs Fry)
Choosing the right method is key when learning how to cook seitan. Each method changes the texture, flavor, and final result.
Steaming (Best Overall Method)
Texture: Firm, chewy, and balanced
Pros:
- Holds shape well
- Not spongy
- Best for most recipes
Cons:
- Takes slightly longer
Best for: Beginners who want perfect homemade seitan texture
Boiling (Soft but Risky)
Texture: Softer, sometimes spongy
Pros:
- Easy method
- Good for tender results
Cons:
- Can become rubbery or airy if boiled too hard
- Flavor may dilute
Best for: Soft seitan recipes like soups or curries
Baking (Dense & Firm)
Texture: Dense, slightly dry
Pros:
- Strong structure
- Great for slicing
Cons:
- Can dry out quickly
Best for: Seitan roast, cutlets, or meal prep
Frying (Crispy Finish)
Texture: Crispy outside, chewy inside
Pros:
- Adds flavor and texture
- Quick cooking
Cons:
- Not a primary cooking method (use after steaming/boiling)
Best for: Seitan chicken-style recipes, sandwiches, wraps
Final Tip (Best Way to Cook Seitan)
For the best seitan recipe, use this combo:
Steam first → then fry or bake for texture and flavor
Seitan Texture Control Guide (Soft, Chewy, Firm)
If you’ve ever asked “why is my seitan rubbery?”, this section will fix it.
How Kneading Affects Texture
- Less kneading (1–2 min) → soft, tender seitan
- Moderate kneading (3–5 min) → balanced texture
- Too much kneading → rubbery and tough
Tip: Don’t overwork the dough if you want soft seitan
Liquid Ratios (Very Important)
- More liquid → softer, lighter texture
- Less liquid → firm and dense
Balanced ratio = perfect chewy seitan
Cooking Time Impact
- Short cooking time → soft and juicy
- Long cooking time → dense and chewy
Overcooking is a common mistake that makes seitan tough
Quick Fix Guide
- Rubbery seitan → reduce kneading
- Spongy seitan → avoid boiling too hard
- Too dense → add more liquid
Mastering these tips will help you make the best homemade seitan every time.
Flavor Engineering (How to Make Seitan Taste Like Meat)

Seitan has a neutral taste, so flavoring is everything. This is how you turn it into a realistic vegan meat substitute.
Umami Boosters (Deep Flavor)
Use ingredients that add rich, savory taste:
- Soy sauce or tamari
- Nutritional yeast
- Garlic & onion powder
- Mushroom powder
These give seitan that meaty flavor
Broth Infusion (Flavor from Inside Out)
Cook your seitan in a well-seasoned broth instead of plain water.
Why it works:
- Seitan absorbs liquid while cooking
- Flavor goes deep inside, not just on the surface
Marinade Strategy (Next-Level Taste)
After cooking, marinate your seitan for extra flavor.
- Use BBQ, teriyaki, or spicy marinades
- Let it sit for at least 30–60 minutes
This step is key for making seitan chicken or beef-style recipes
Pro Tip (Best Flavor Combo)
Season dough + cook in broth + marinate after cooking This 3-step method creates the most flavorful homemade seitan recipe
Common Mistakes That Ruin Seitan (And Fixes)
Making homemade seitan is simple, but small mistakes can affect the texture and flavor. Here are the most common problems and how to fix them.
Rubbery Seitan → Over-Kneading
Problem: Seitan turns too tough and chewy
Why it happens:
- Too much kneading develops excess gluten
Fix:
- Knead for only 2–5 minutes
- For softer texture, reduce kneading time
Bland Seitan → Weak Seasoning
Problem: Seitan tastes plain or flavorless
Why it happens:
- Not enough seasoning in dough or broth
Fix:
- Add strong umami ingredients like soy sauce and spices
- Always cook in flavorful broth, not plain water
Spongy Seitan → Too Much Liquid or Boiling Too Hard
Problem: Seitan feels airy or sponge-like
Why it happens:
- Too much water in dough
- Rapid boiling instead of gentle cooking
Fix:
- Use balanced liquid ratios
- Simmer gently instead of boiling aggressively
Dry Seitan → Overcooked
Problem: Seitan becomes hard and dry
Why it happens:
- Cooking for too long
- Baking without enough moisture
Fix:
- Monitor cooking time carefully
- Add moisture (broth or marinade) after cooking
Flavor Variations You Must Try
One of the best things about seitan recipes is how easy they are to customize. You can turn basic seitan into different flavors depending on your dish.
Chicken-Style Seitan
- Use light seasoning, garlic, and onion powder
- Shred the seitan for a pulled chicken texture
Beef-Style Seitan
- Add soy sauce, smoked paprika, and black pepper
- Cook longer for a firm, dense texture
BBQ or Spicy Seitan
- Use BBQ sauce or chili-based marinades
- Finish with frying for a bold flavor
Quick Marinades (Easy Flavor Boost)
- Teriyaki sauce
- Garlic soy marinade
- Lemon herb mix
Let seitan sit in marinade for at least 30 minutes for best results
Nutrition & Health Benefits

Seitan is one of the most popular high-protein vegan foods, especially for those looking for a strong meat substitute.
Protein Content
- Very high in protein (around 20–25g per serving)
- Great for building and maintaining muscle
Pros
- High protein and low fat
- Affordable and easy to make
- Very versatile in recipes
Cons
- Made from wheat (contains gluten)
- Low in certain amino acids (can combine with other foods)
Who Should Avoid Seitan
- People with gluten intolerance or celiac disease
- Those sensitive to wheat-based products
Seitan for Different Diet Goals
Seitan fits into many diets, making it a flexible plant-based protein option.
High Protein Diets
Seitan is ideal for anyone needing more protein, especially in a vegan diet.
Vegan Bodybuilding
Due to its high protein content, seitan is often used in vegan muscle-building diets along with other plant proteins.
Low-Fat / Low-Carb Diets
Seitan is naturally low in fat and carbs, making it suitable for lean eating plans.
How to Store, Freeze & Meal Prep Seitan
Proper storage helps keep your homemade seitan fresh, flavorful, and ready to use anytime.
Fridge Storage
- Store cooked seitan in an airtight container
- Keep it in a little broth or marinade to maintain moisture
Shelf life:
- Lasts about 4–5 days in the fridge
Freezing Seitan
- Let seitan cool completely before freezing
- Store in freezer-safe bags or containers
- You can freeze it in portions for easy use
Tip: Freeze with a bit of broth to prevent dryness
Shelf Life (Important Guide)
- Fridge: 4–5 days
- Freezer: Up to 2–3 months
Proper storage keeps your vegan meat substitute soft, flavorful, and ready for meal prep
How to Use Seitan (Best Serving Ideas)
Once you know how to make seitan, the next step is using it in delicious meals. Its meaty texture makes it perfect for many dishes.

Stir Fry
- Cut seitan into strips or chunks
- Cook with vegetables and sauces
Great for quick, high-protein meals
Sandwiches & Wraps
- Use seitan chicken-style pieces
- Add sauces, veggies, and bread
Perfect for lunch or on-the-go meals
Curries & Saucy Dishes
- Add seitan to curries or gravies
- It absorbs flavors very well
Works great in rich, spicy dishes
Meal Prep Ideas
- Cook a large batch of homemade seitan
- Store in portions for the week
- Use in different recipes daily
Ideal for saving time while keeping meals high in protein and flavorful
FAQs About How To Make Seitan
Here are answers to common questions people ask when learning how to make seitan.
Why is my seitan rubbery?
This usually happens due to over-kneading or overcooking. Reduce kneading time and cook gently to get a softer texture.
How to make seitan soft?
Use less kneading, more liquid, and avoid long cooking times. Steaming instead of boiling can also help create soft, tender seitan.
Can you make seitan without gluten?
No, traditional seitan is made from vital wheat gluten, so there is no true gluten-free version. You can try other alternatives like tofu or tempeh.
What is the best way to cook seitan?
Steaming is the best method for balanced texture. For extra flavor and texture, steam first, then fry or bake.
Is seitan healthy?
Yes, seitan is a high-protein vegan food that is low in fat and carbs. However, it is not suitable for people with gluten intolerance.
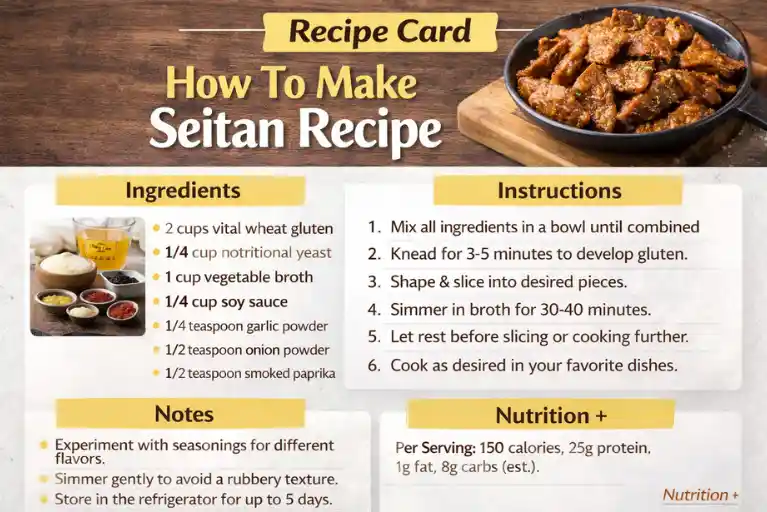
Recipe Card – How To Make Seitan Recipe
Course: Main DishesCuisine: VeganDifficulty: Easy4
servings10
minutes30
minutes160
kcalLearn how to make seitan recipe at home with this easy step-by-step method Get perfect texture, rich flavor, and high-protein vegan meat every time
Ingredients
1 cup vital wheat gluten
1 cup vegetable broth (for flavor)
2 tbsp soy sauce (umami boost)
1 tbsp nutritional yeast (optional but recommended)
1 tsp garlic powder
1 tsp onion powder
½ tsp black pepper
1 tbsp olive oil
Instructions
- Mix Ingredients
In a bowl, combine vital wheat gluten, spices, and nutritional yeast. Add broth, soy sauce, and oil. Mix into a dough. - Knead the Dough
Knead for 2–5 minutes until slightly elastic. Avoid over-kneading to prevent rubbery seitan. - Shape the Seitan
Shape into logs, chunks, or strips depending on your recipe (great for seitan chicken style). - Cook the Seitan
Steam for 25–30 minutes (best method)
Or simmer gently in broth - Optional Finish
Slice and pan-fry or bake for extra flavor and texture - Nutrition (Approx per serving)
Protein: 20–25g
Calories: 150–180
Fat: 2–4g
Carbs: 6–8g
👉 A great high-protein vegan meat substitute for everyday meals
Recipe Video
Notes
- Use flavorful broth to avoid bland taste
- Do not boil aggressively — it can make seitan spongy
- Adjust kneading time to control texture (soft vs chewy)
- Let seitan rest before slicing for better structure
Final Thoughts
Learning how to make seitan at home is a game-changer if you want a healthy, affordable, and versatile plant-based protein. With the right balance of kneading, liquid ratio, and cooking method, you can create seitan that is soft, chewy, and full of flavor.
This guide not only gives you a step-by-step seitan recipe, but also helps you avoid common mistakes and improve your results every time. Whether you’re making seitan chicken, beef-style dishes, or meal prep recipes, this simple method will give you consistent results. Start with the basics, experiment with flavors, and soon you’ll master the best homemade seitan recipe for your needs.