

Creating your own sourdough starter recipe at home might sound complicated, but it’s actually very simple when you understand the basics. A sourdough starter is just a mixture of flour and water that captures natural wild yeast from the environment. Over a few days, this mixture begins to ferment and becomes active enough to help bread rise naturally.
If you’ve ever wondered how to make sourdough starter from scratch, this guide will walk you through everything step by step. Even beginners can succeed with the right method, clear timing, and simple ingredients. You’ll learn how long sourdough starter takes, how to feed it, and how to know when it’s ready.
By the end, you’ll have a strong, healthy homemade sourdough starter you can use for baking anytime with confidence.
Quick Answer: What Is a Sourdough Starter and How Does It Work
A sourdough starter is a natural mixture of flour and water that ferments over time using wild yeast and beneficial bacteria. This process creates a live culture that helps bread rise without commercial yeast.
To make a sourdough starter recipe, simply mix equal parts of flour and water, then let it sit at room temperature. Feed it daily with fresh flour and water for about 5–7 days. During this time, natural fermentation develops bubbles and a slightly tangy smell.
Your homemade sourdough starter is ready to use when it becomes active, bubbly, and doubles in size within a few hours after feeding. This indicates strong fermentation and enough yeast activity for baking.
Sourdough Starter at a Glance (Quick Overview Table)
| Factor | Details |
| Time Required | 5–7 days to create an active sourdough starter from scratch |
| Ingredients | Flour + Water (simple 1:1 ratio) |
| Difficulty Level | Easy (Beginner-Friendly) |
| Key Success Factors | Consistent feeding, correct sourdough starter ratio, warm temperature, patience |
This sourdough starter recipe is simple, but success depends on consistency and environment. Even beginners can learn how to make sourdough starter with the right steps.
What Is a Sourdough Starter and How It Works
A sourdough starter is a natural mixture of flour and water that captures wild yeast from the air. Unlike store-bought yeast, this natural culture grows slowly and develops stronger flavor over time.
Wild Yeast Explained (Simple Terms)
Wild yeast is naturally present in flour and the environment. When you mix flour and water, it begins feeding on natural sugars and starts producing gas. This is what makes your homemade sourdough starter rise and become active.
Fermentation Basics
During sourdough fermentation, yeast and good bacteria work together to break down the flour. This process creates:
- Bubbles (carbon dioxide) → helps bread rise
- Tangy flavor → gives sourdough its unique taste
This is why sourdough fermentation is slower but more flavorful than regular baking.
Why It’s Different from Commercial Yeast
- Natural vs processed → sourdough uses wild yeast
- Slower fermentation → better flavor and texture
- Health benefits → easier digestion for many people
In simple terms, a sourdough starter recipe creates a living culture that replaces packaged yeast and gives your bread a richer, more natural taste.
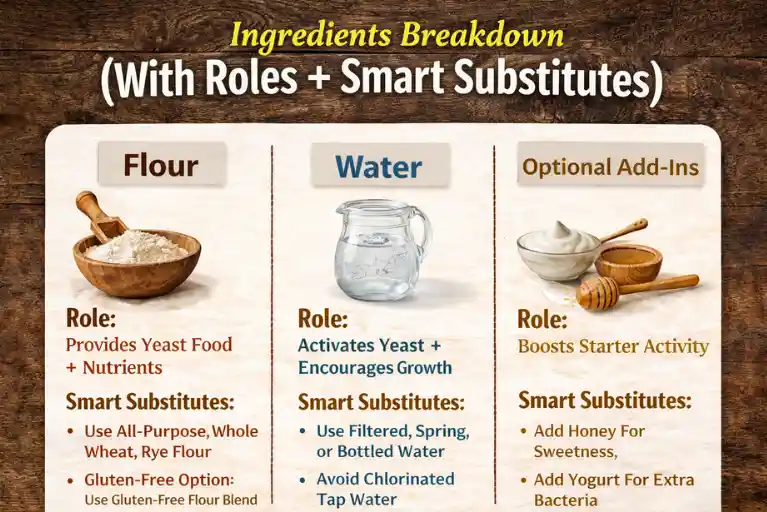
Ingredients Breakdown (With Roles + Smart Substitutes)
You might also like: Smoked Turkey Rub Recipe
Creating a successful sourdough starter recipe starts with understanding your ingredients. Even though it only uses flour and water, the type and quality you choose can affect how fast and strong your starter develops.
Flour Types (AP, Whole Wheat, Rye)
- All-Purpose Flour (AP) → Easy to use and widely available, great for beginners
- Whole Wheat Flour → Rich in nutrients, helps starter grow faster
- Rye Flour → Best for boosting activity, produces strong sourdough fermentation
Pro Tip: Many bakers mix AP + whole wheat to balance strength and stability in a homemade sourdough starter.
Water Quality
- Use filtered or dechlorinated water for best results
- Avoid heavily chlorinated tap water, as it can slow down wild yeast activity
Optional Tools (Helpful but Not Required)
- Glass jar (for visibility)
- Digital scale (for accurate sourdough starter ratio)
- Spoon or spatula
Best Flour Comparison Table (Performance + Results)
| Flour Type | Fermentation Speed | Flavor | Best For |
| All-Purpose | Medium | Mild | Beginners |
| Whole Wheat | Fast | Nutty | Strong starter growth |
| Rye | Very Fast | Deep, tangy | Boosting weak starters |
Choosing the right flour helps improve how to make sourdough starter successfully and avoid slow fermentation issues.
Sourdough Starter Ratio Explained
Understanding the correct sourdough starter ratio is key to building a healthy and active starter.
1:1:1 Ratio (The Standard Method)
This means:
- 1 part starter
- 1 part flour
- 1 part water
This balanced ratio keeps your sourdough starter feeding consistent and predictable.
Hydration Basics (Simple Explanation)
Hydration refers to how much water is in your mixture:
- Equal flour and water = 100% hydration
- Creates a smooth, thick batter texture
Proper hydration helps your sourdough starter from scratch develop bubbles and rise correctly.
Common Ratio Mistakes (Too Thick vs Too Runny)
- Too Thick Starter
- Hard to mix
- Slow fermentation
- Weak bubble formation
- Too Runny Starter
- Watery texture
- Poor structure
- May not rise properly
Aim for a thick pancake batter consistency for best results.
Starter Success Formula (3 Core Rules for Guaranteed Results)
If you follow these 3 rules, your easy sourdough starter recipe will almost always succeed.
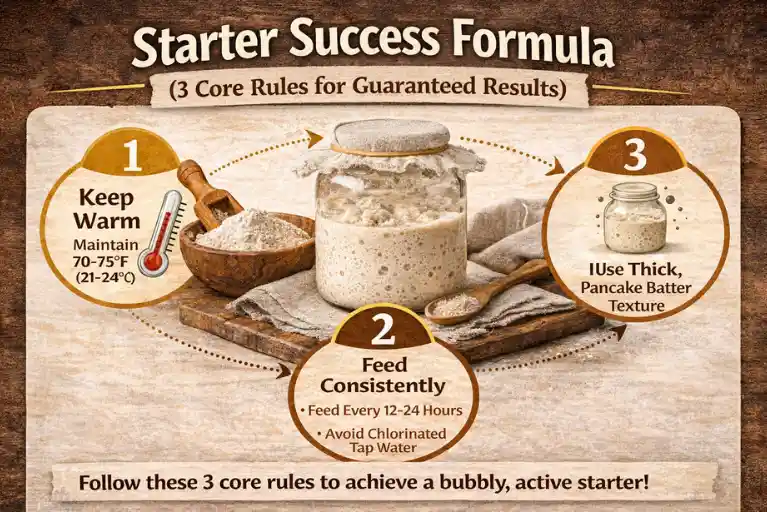
1. Consistency
Feed your starter at the same time daily. Regular feeding keeps the wild yeast fermentation active and stable.
2. Temperature
Keep your starter in a warm spot (around 21–26°C / 70–78°F).
Temperature directly affects how fast your sourdough starter recipe develops.
3. Feeding
Proper and regular sourdough starter feeding schedule is essential:
- Feed daily in early stages
- Adjust once the starter becomes active
Step-by-Step Sourdough Starter Process (Day-by-Day Guide)
This sourdough starter recipe follows a simple day-by-day method so beginners can clearly understand how to make sourdough starter from scratch.
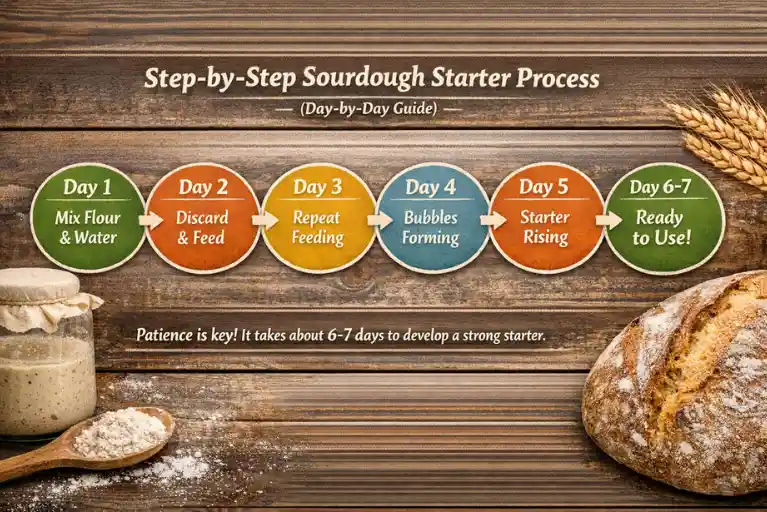
Day 1
Mix equal parts flour and water. Stir well and cover loosely.
What’s normal: Thick paste, no bubbles yet
What’s a problem: Extremely dry or watery mixture
Day 2
You may see a few bubbles forming. Discard half and feed with fresh flour and water.
What’s normal: Light bubbles, mild smell
What’s a problem: No change at all (be patient)
Day 3
Activity increases. The starter may rise slightly.
What’s normal: More bubbles, slightly sour smell
What’s a problem: Strong unpleasant smell (temporary phase is normal)
Day 4
Starter may look very active, then suddenly slow down.
What’s normal: Rise and fall cycle
What’s a problem: No bubbles at all
Day 5
Fermentation stabilizes. Continue sourdough starter feeding daily.
What’s normal: Consistent bubbles
What’s a problem: Thin, lifeless texture
Day 6
Starter becomes stronger and more predictable.
What’s normal: Noticeable rise after feeding
What’s a problem: Weak or slow growth
Day 7
Your homemade sourdough starter should now be active and ready.
What’s normal: Doubles in size within hours
What’s a problem: No rise (needs more time)
Visual Timeline (Bubbles, Rise, Smell Changes)
- Early Days (1–2): No bubbles, flour smell
- Mid Stage (3–4): Bubbles increase, sour smell develops
- Late Stage (5–7): Strong rise, tangy aroma
This timeline helps you understand how long sourdough starter takes and what changes to expect.
Sourdough Starter Growth Timeline (Realistic Expectations)
Understanding the timeline helps avoid frustration when learning how to start sourdough starter at home.
- Days 1–3: Early fermentation begins
- Days 4–5: Activity becomes inconsistent
- Days 6–7: Starter stabilizes and strengthens
Most starters become usable in 5–7 days, but some may take longer depending on temperature and flour type.
How to Know When Your Starter Is Ready
A sourdough starter recipe is only successful when your starter is strong enough for baking.
1. Doubling in Size
After feeding, your starter should double in volume within 4–6 hours.
2. Bubble Activity
Look for many small and large bubbles throughout the mixture. This shows active sourdough fermentation.
3. Smell Test
A healthy starter smells:
- Slightly tangy and fresh
- Not rotten or moldy
These signs confirm your sourdough starter from scratch is ready to use.
Texture & Smell Guide (Good vs Bad Starter)
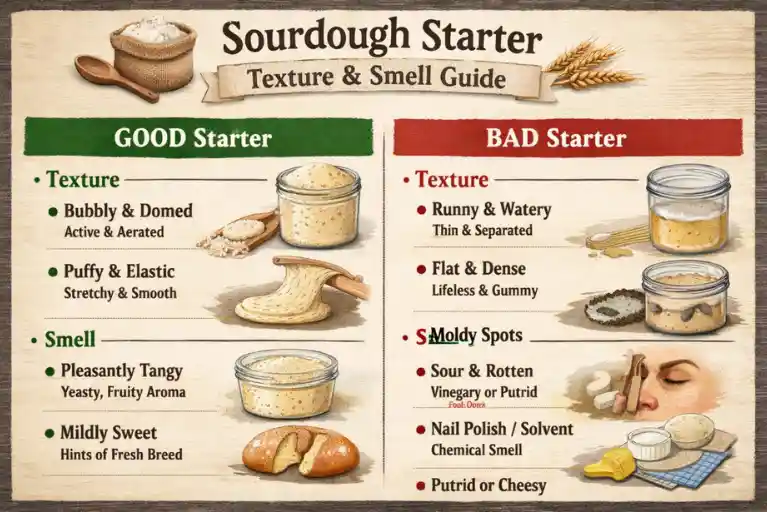
This section builds trust and helps beginners avoid mistakes.
Healthy Starter Signs
- Texture: Thick, airy, slightly stretchy
- Smell: Mild sour, yogurt-like
- Appearance: Bubbly and active
Bad Starter Signs
- Texture: Too watery or overly stiff
- Smell: Rotten, cheesy, or foul
- Appearance: Mold (green, black, or pink spots)
If your sourdough starter smells bad, it may need fixing or restarting.
Feeding Your Sourdough Starter
Proper sourdough starter feeding is essential to keep your starter alive and active.
Daily Feeding (Beginner Stage)
Feed your starter every 24 hours:
- Discard half
- Add fresh flour and water
Feeding Ratios
Use the standard 1:1:1 ratio:
- 1 part starter
- 1 part flour
- 1 part water
When and How Often to Feed
- New starter: Once daily
- Active starter: Once or twice daily
- Fridge storage: Once weekly
A consistent sourdough starter feeding schedule keeps your starter strong and ready for baking anytime.
Sourdough Starter Storage & Maintenance Guide
Proper storage is key to keeping your sourdough starter recipe alive and healthy. Once your starter becomes active, you can choose how to maintain it based on your baking routine.
Room Temperature vs Fridge
- Room Temperature
- Best if you bake often
- Requires daily sourdough starter feeding
- Keeps fermentation very active
- Refrigerator Storage
- Best for occasional baking
- Feed once a week
- Slows down sourdough fermentation
If you’re not baking daily, storing your homemade sourdough starter in the fridge is easier and more manageable.
Long-Term Care
- Feed regularly to maintain strength
- Use clean jars to prevent contamination
- Refresh starter before baking for best results
Proper care ensures your sourdough starter from scratch stays active for months or even years.
What If You Skip Feeding?
- Starter may become weak or sluggish
- A liquid layer (hooch) may form on top
- Smell may become stronger
Simply discard some and resume a regular sourdough starter feeding schedule to revive it.
Temperature & Climate Control Guide
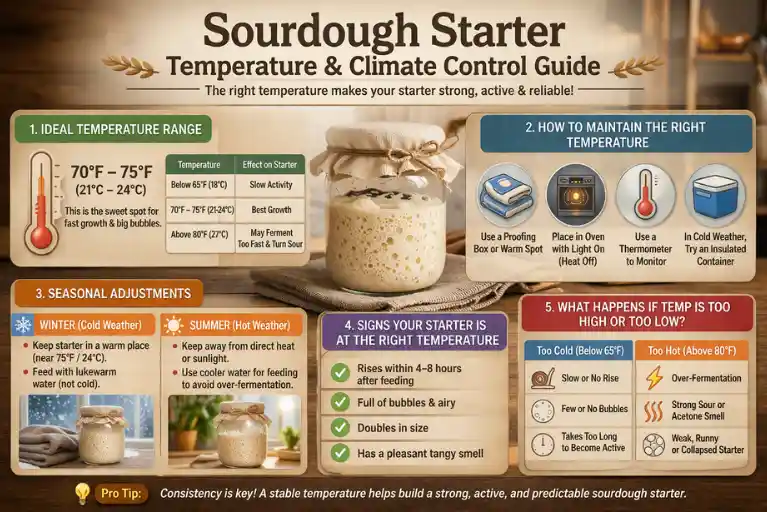
Temperature plays a huge role in how fast your sourdough starter recipe develops.
Ideal Temperature Range
- 21–26°C (70–78°F) is perfect
- Warm conditions = faster fermentation
- Cooler conditions = slower growth
Cold vs Hot Climate Adjustments
- Cold Climate
- Place starter in a warm spot (oven light, kitchen corner)
- Fermentation will take longer
- Hot Climate
- Feed more frequently
- Keep in a cooler area to prevent over-fermentation
Adjusting temperature helps improve how to make sourdough starter successfully in any environment.
How to Fix Slow Fermentation
- Move starter to a warmer place
- Use whole wheat or rye flour to boost activity
- Maintain consistent feeding
Temperature control is one of the biggest factors behind a strong sourdough starter from scratch.
Best Flour for Sourdough Starter
The type of flour you use directly affects your sourdough starter recipe results.
White Flour (All-Purpose)
- Slower fermentation
- Mild flavor
- Best for beginners
Whole Wheat Flour
- Faster fermentation
- More nutrients for yeast
- Slightly nutty flavor
Rye Flour
- Fastest fermentation
- Very active starter
- Strong, tangy flavor
Which Works Best?
- Fastest growth: Rye flour
- Balanced option: Whole wheat
- Easy maintenance: All-purpose
Many bakers mix flours to create a strong and stable homemade sourdough starter.
Common Sourdough Starter Problems
Even a well-made sourdough starter recipe can face issues. Here’s how to fix them.
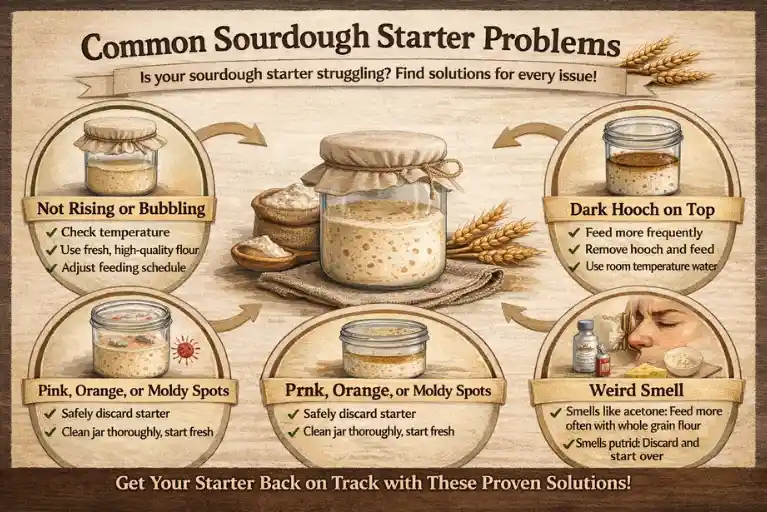
1. Starter Not Rising
- Cause: Weak yeast or cold temperature
- Fix: Move to warm area and feed consistently
2. No Bubbles
- Cause: Early stage or inactive fermentation
- Fix: Be patient and continue feeding
3. Bad Smell
- Cause: Imbalance in bacteria
- Fix: Discard and refresh with fresh flour and water
4. Mold Formation
- Cause: Contamination or poor hygiene
- Fix: Discard entire starter and restart
Quick Fix Table (Problem → Cause → Solution)
| Problem | Cause | Solution |
| Not rising | Cold temp / weak starter | Move to warm area, feed regularly |
| No bubbles | Early stage | Continue feeding, wait longer |
| Bad smell | Bacteria imbalance | Refresh starter |
| Mold | Contamination | Discard and restart |
Understanding these issues helps you fix problems quickly and maintain a strong easy sourdough starter recipe without frustration.
Why Sourdough Starter Fails (Science Explained)
Even a well-followed sourdough starter recipe can fail if the balance inside the starter is off. Understanding the science helps you fix problems faster.
Bacteria Imbalance
A healthy sourdough starter needs the right balance of wild yeast and beneficial bacteria. If harmful bacteria take over, the starter becomes weak or smells bad.
This is why consistent sourdough fermentation is important.
Overfeeding / Underfeeding
- Overfeeding → dilutes yeast, slows activity
- Underfeeding → starves yeast, weak growth
A proper sourdough starter feeding schedule keeps the culture stable and active.
Environmental Factors
- Temperature too low → slow fermentation
- Poor water quality → weak yeast activity
- Wrong flour → less nutrient support
Your environment directly affects how well your sourdough starter from scratch develops.
Beginner Mistakes That Kill Your Starter
Avoiding these common mistakes will help you succeed with your easy sourdough starter recipe.
Wrong Ratios
Using incorrect sourdough starter ratio can make the starter too thick or too runny.
Always stick to a balanced feeding method.
Ignoring Temperature
Keeping your starter in a cold place slows down growth.
Maintain a warm environment for healthy sourdough fermentation.
Inconsistent Feeding
Skipping feeds or feeding at random times weakens the starter.
Consistency is key when learning how to make sourdough starter.
How to Strengthen a Weak Starter
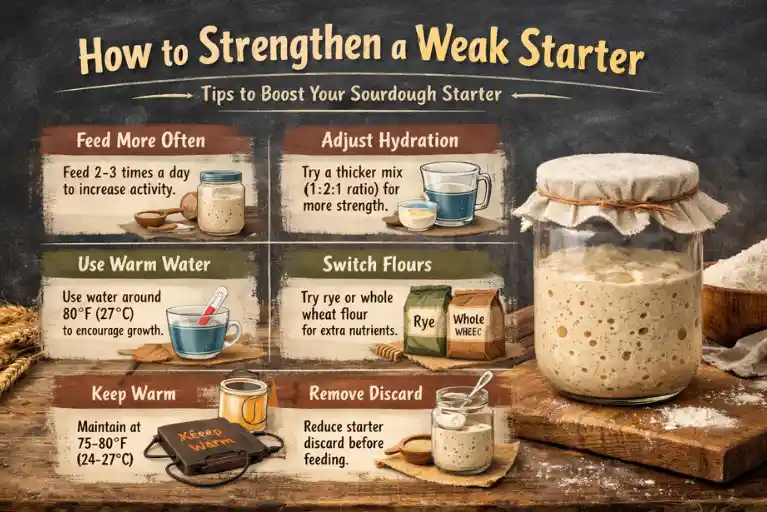
If your homemade sourdough starter feels weak or slow, you can revive it with a few simple steps.
Feeding Adjustments
- Feed more frequently
- Use fresh flour and clean water
This boosts yeast activity in your sourdough starter recipe.
Flour Switching
Switch to whole wheat or rye flour for a few feeds.
These flours provide extra nutrients to strengthen your starter.
Temperature Hacks
- Place starter in a warm spot
- Use oven light or insulated area
Warmer conditions speed up sourdough fermentation and improve growth.
What to Do With Sourdough Starter Discard
When feeding your starter, you’ll often remove some portions. This is called sourdough starter discard, and it can be used in many ways.
Easy Recipes
- Pancakes
- Waffles
- Crackers
These are simple ways to discard without wasting it.
Practical Uses
- Add to baking for extra flavor
- Use in quick breads
- Experiment with new recipes
Using discard wisely makes your sourdough starter from scratch more efficient and sustainable.
Pro Tips for Faster, Stronger Starter Growth
If you want your sourdough starter recipe to grow faster and become more active, these simple tips can make a big difference.
Warm Environment Tricks
- Keep your starter in a warm place (21–26°C / 70–78°F)
- Place it near a kitchen corner or inside the oven with the light on
A warm environment boosts wild yeast fermentation and speeds up activity.
Mixing Techniques
- Stir well to add oxygen
- Scrape down sides of the jar to keep it clean
Proper mixing helps your homemade sourdough starter develop stronger bubbles.
Timing Tips
- Feed at the same time every day
- Observe peak rise (when it doubles)
Consistent timing improves your sourdough starter feeding schedule and overall strength.
FAQs About Sourdough Starter Recipe
How long does sourdough starter take?
A sourdough starter from scratch usually takes 5–7 days to become active, depending on temperature and flour type.
Why is my starter not rising?
This can happen due to cold temperature, weak fermentation, or inconsistent feeding. Keeping a proper sourdough starter ratio and warm environment helps fix this.
Can I skip feeding?
Skipping one feeding occasionally is fine, but frequent skipping weakens your sourdough starter recipe over time.
How often should I feed?
- Beginner stage → once daily
- Active starter → once or twice daily
- Fridge storage → once weekly
Can I use the starter straight from the fridge?
It’s best to feed your starter once or twice after taking it out of the fridge before using it for baking.
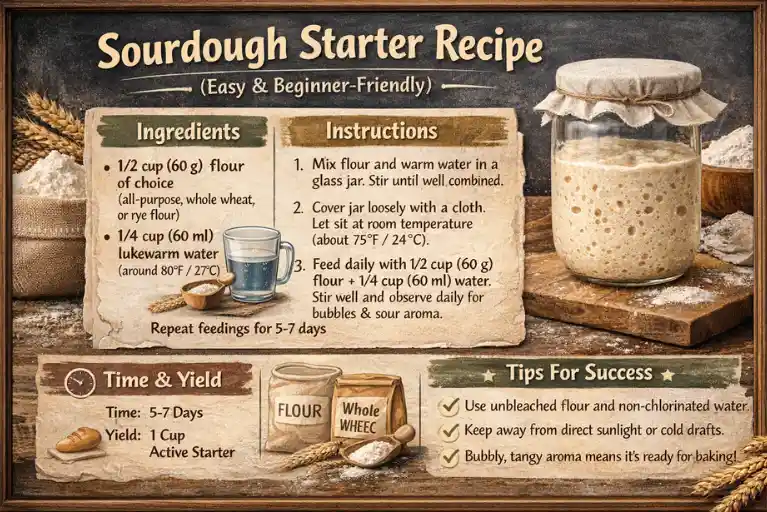
Recipe Card – Sourdough Starter Recipe (Easy & Beginner-Friendly)
Course: Main DishesCuisine: Baking, Artisan BreadDifficulty: Easy1
servings5
minutes7
minutesMinimal
kcalLearn how to make a perfect sourdough starter recipe from scratch with simple steps, feeding tips, and expert guidance. This easy beginner-friendly method helps you build a strong, bubbly starter in just days for better baking results every time.
Ingredients
1/2 cup flour (all-purpose, whole wheat, or rye)
1/2 cup water (filtered or dechlorinated)
1/2 cup flour
1/2 cup water
- Equipment
Glass jar or container
Spoon or spatula
Measuring cups or digital scale
Instructions
- Day 1
Mix flour and water in a jar until smooth
Cover loosely and leave at room temperature - Day 2
You may see small bubbles
Discard half and feed with fresh flour and water - Day 3
Starter becomes more active
Continue daily feeding - Day 4–5
Rise and fall cycle begins
Keep feeding consistently - Day 6–7
Starter should double in size within hours
Now your sourdough starter recipe is ready to use
Recipe Video
Notes
- Keep in a warm place (21–26°C)
- Use clean tools to avoid contamination
- Consistency is key for success
Conclusion
Making your own sourdough starter recipe is easier than it seems when you follow simple steps and stay consistent. With just flour, water, and patience, you can create a strong and active homemade sourdough starter right at home.
The key is to focus on regular feeding, proper temperature, and correct ratios. Even if your starter doesn’t work perfectly at first, small adjustments can quickly fix it.